| Quantity | 3+ units | 10+ units | 30+ units | 50+ units | More |
|---|---|---|---|---|---|
| Price /Unit | $25.39 | $24.87 | $24.10 | $23.06 | Contact US |
 Secondhand Imported UP19K-50L-H5 Laser Power Energy Meter 90W/15J Rang & Software Display for GENTEC
$538.14
 F999M Portable Professional Leakage Detector for Water Pipes/Heating Pipes/Fire Hoses Leakage Detection
$498.30
 F999K Portable Leakage Detector for Water Pipes/Heating Pipes/Fire Hoses Leakage Detection with Pointer Spectrum Display
$342.83
DC 0-300V Battery Monitor Meter Capacity Voltage Ammeter Coulometer + Hall Sensor 400A WLS-PVA400
Description:
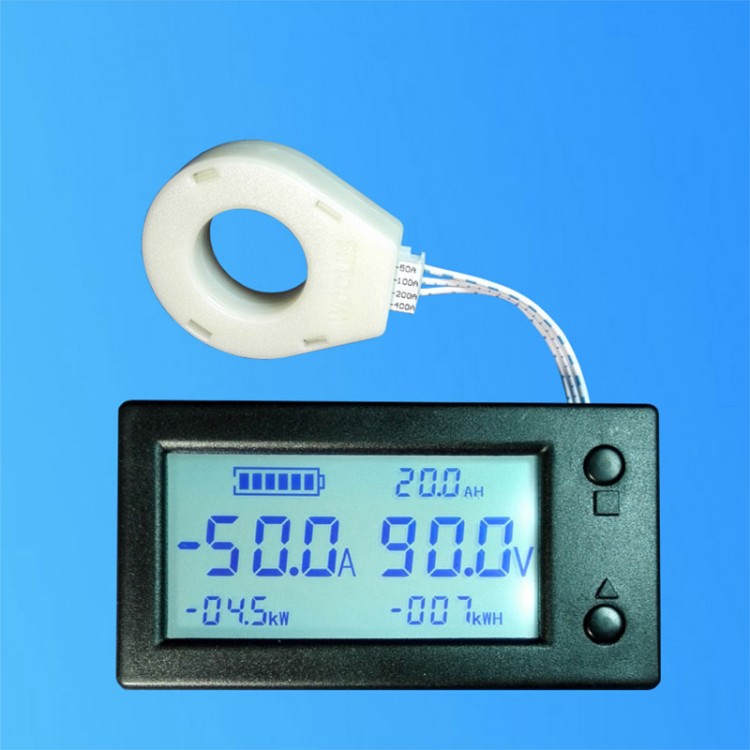
This is our brand new STN LCD Hall Coulomb Meter, Battery Coulomb Meter. The coulometer with hall sensor can be installed very easily. No need to consider the problem of power supply and common ground. Because hall measurement is an isolated measuring way, which will not damage the original line, and is N times safer and more reliable than a general shunt coulomb meter.
With STN full-view LCD screen, readings can be clearly shown indoors, outdoors, during the day and night, which can completely avoid the disadvantages of digital tube under the sun. All information is displayed simultaneously in full screen. It is a real remaining capacity meter that displays voltage, current, power, electricity, and electric energy. Suitable for all kinds of storage batteries, lead acid, polymer lithium batteries, lithium iron phosphate and other batteries. It is highly recommended for users.
Functions:
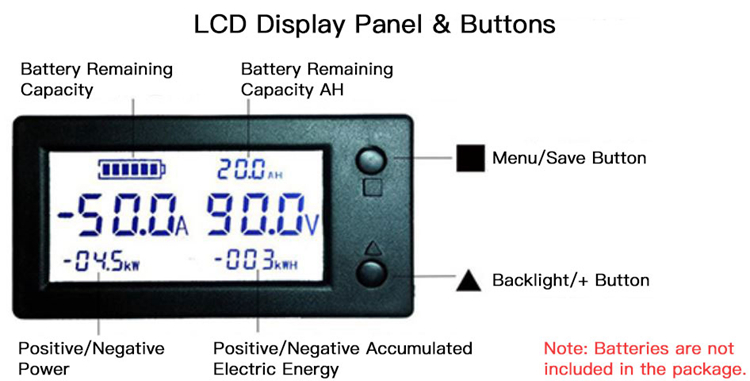
1. Measure remaining battery percentage (indicated by the grids in battery icon) and remaining battery capacity AH.
2. Measure DC positive and negative bidirectional current.
3. Measure DC voltage.
4. Measure DC positive and negative power.
5. Measure cumulative electric energy in both DC positive and negative directions.
6. Over-voltage alarm flashing function. Alarm voltage parameter can be set by yourself.
7. Low-voltage alarm flashing function. Alarm voltage parameter can be set by yourself.
8. Over-current alarm flashing function. Alarm current parameter can be set by yourself.
9. Low battery remaining capacity alarm. The battery icon will flash continuously, prompting users to charge.
10. When charging, the battery icon running light scrolls.
11. Automatically fill battery capacity at full voltage.
12. Clear current function.
13. Clear the accumulated electric energy.
14. Backlight can be turned off or on manually.
15. Power-down data saving function. Battery power and accumulated electric energy are automatically saved when power-off.
16. Hall sensor isolated measurement enables safe, reliable, easy, and simple installation.
17. Using STN full-view LCD screen, no dead angle of 360 degrees. With backlight, it can be clearly visible under direct sunlight, no matter it is used at night, in daytime, indoors, or outdoors.
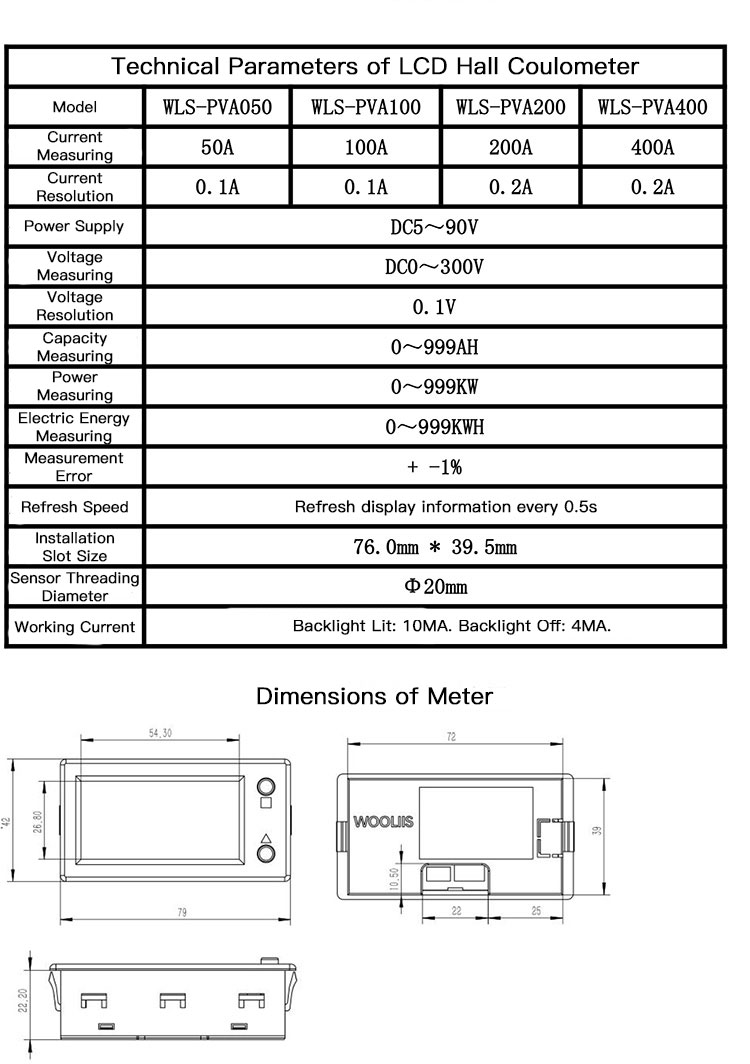
18. Ultra-wide power supply voltage range: DC5-90V.
Package Included:
- 1 x Meter
- 1 x Hall Sensor
- 1 x Sensor Cable
- 1 x Power Cord
FAQ:
- Q1: Is it visible under the sunlight?
- A1: Yes. With STN LCD display and backlight, it is visible during the day and night.
- Q2: Do you need an extension cable?
- A1: The standard sensor extension cable is 15CM in length. If you need to extend it, you can buy our shielded extension cable. (Note: This STN LCD Hall coulometer can only use our shielded extension cords instead of ordinary extension cords)
- Q3: Is hall sensor included in the package?
- A3: Yes, it is. You will get STN LCD meter + Hall sensor + 15CM sensor cable + 15CM power cable.
- Q4: Does this meter use a two-wire or three-wire system?
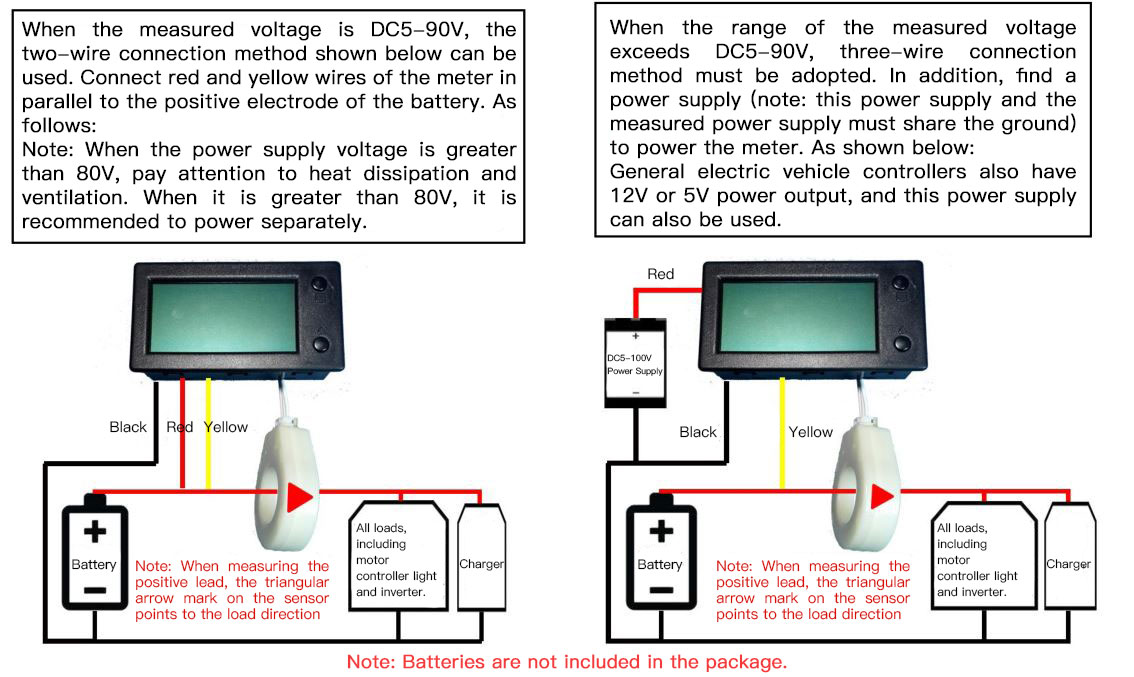
- A4: When the measuring voltage of the meter is within DC5-90V, connect red and yellow wires together as the positive lead connected to the positive pole of power supply. Black wire is connected to the negative pole. So this is a two-wire connection. When the measured voltage exceeds the DC5-90V range, a three-wire system is used. This allows a wider measurement voltage range. It can measure ultra-wide voltage between DC0 ~ 300V.
- Q5: Is paper instructions included in the package?
- A5: No. To protect our environment, paper instructions is not enclosed. Users can follow our instructions below.
Using Steps:
1. Wiring: Connect correctly. When discharging, the coulomb counter shows a positive current. The coulometer displays a negative current while charging. If not, it means that your sensor is in reverse connection, and you can rewire the sensor.
2. Parameter Settings: Set the parameters. The two parameters of the battery's rated capacity AH and the automatic full-charge voltage FU must be set. If the newly installed good coulomb counter is not zero at no load, it needs to be cleared at no load.
3. After wiring and setting parameters, the meter will not display the battery capacity immediately. At this time, the battery icon and capacity are still empty. You need to fully charge your battery to display the remaining capacity normally.
Button Usage Introduction:
1. Backlight Control:
In standby display, short press "▲" key to turn on or off the screen backlight. Save backlight state automatically when it is power-off.
2. Clear Current:
In standby display, when there is no load, long press "▲" key to clear current. (Note: the load must be empty when clearing, otherwise it is inaccurate). No-load state is the status when it is not charging or discharging.
3. Clear Electric Energy:
In standby display, long press "█" key and then release to clear positive and negative electric energy accumulated in both directions at the same time.
4. Setting Parameters: (Attention: 【1】【2】menu parameters must be set. Other settings depends on your needs)
In standby display, short press "█" key to switch menus in order:
【1】"AH XXX. X" is the menu of battery nominal capacity setting. It must be set.
【2】 "FU XXX. X" is the menu of auto-full voltage setting menu after being fully charged. When the voltage reaches this value, the electricity of the coulomb meter is automatically filled and corrected to 100% full. This parameter needs setting. Because the charging and discharging efficiency of batteries are inconsistent. If it is not set, after multiple charging and discharging, the cumulative error of the parameter electricity will be relatively large.
【3】 "HU XXX. X" is the menu of over-voltage alarm setting.
【4】 "LU XXX. X" is the menu of low-voltage alarm setting.
【5】 "HA XXX. X" is the menu of over-current alarm setting.
Battery Nominal Capacity Setting:
(1) In standby display, short press █ key to switch to the menu "AH XXX. X".
(2) The first digit of the menu parameter will flash, short press ▲ key to add the number by one. After finishing the setting of first digit, please not operate within 5s, it will automatically turn to the next number to flash. And you short press ▲ key, this digit will increase by one. No operation within 5s, it will automatically turn to next digit to set. Following the above method, 4 digits are set.
(3) After setting four digits, long press █ key (Note: it is not short press) and then release the key to save the set parameters. When they are saved successfully, the menu will flicker twice.
For example: When you want the battery nominal capacity to be 20AH. You need to set this menu parameter to be AH 020.0, and long press █ to save parameter when finish settings.
Setting Method of Full Voltage by Automatic Adding after Fully Charged:
(1) In standby display, short press █ key, and switch to the menu "FU XXX. X".
(2) The first digit of the menu parameter will flash, short press ▲ key to add the number by one. After finishing the setting of first digit, please not operate within 5s, it will automatically turn to the next number to flash. And you short press ▲ key, this digit will increase by one. No operation within 5s, it will automatically turn to next digit to set. Following the above method, 4 digits are set.
(3) After setting four digits, long press █ key (Note: it is not short press) and then release the key to save the adjusted parameters. When they are saved successfully, the menu will flicker twice. (Note: It is recommended to set this voltage to 0.3V below the voltage value displayed by the coulomb counter when the battery is fully charged and the charger has not been unplugged. )
Following the above methods, you can set the alarm voltages of "HU XXX. X" (over-voltage), "LU XXX. X" (low-voltage), and "HA XXX. X" (over-current).
(Note: When parameters "HU XXX. X" (over-voltage), "LU XXX. X" (low-voltage), and "HA XXX. X" (over-current) are set to be 000.0, it means that alarm flashing function is off. And the alarm functions are off by default at the factories.)
Wiring:
This LCD Hall coulometer is designed with ultra-wide supply voltage. The meter adopts a three-wire design, and the voltage measurement range can be wider. If the measured voltage range is DC5-90V, a two-wire connection mode can also be used, and the power supply is more flexible and convenient. There are three wires on the back of the meter, as shown below:
【1】Black wire connects power supply -.
【2】Red wire connects power supply +. (Attention: The power supply voltage range is DC5 to 9 0V. Please not exceed the voltage range, otherwise the meter will be burned out.)
【3】 Yellow lead is connected to the voltage measurement input lead. It needs to be connected to the lead of the voltage to be measured.
The above wiring diagram is the wiring method of the same interface for charging and discharging. If a battery is discharged and charged without sharing the same port, then pass the power cable of the positive electrode of discharge and the positive electrode of charge through the hole in the middle of the sensor. It does not matter if the charging current cannot be measured for other reasons. We can use the coulomb counter to fully reset the power to 100% full power, but this time it must be fully charged, the charging current will not be seen during the charging process, there will be no running lights, and the power will not increase slowly. It will reset to 100% when it is fully charged.
The figure above is for measuring the positive main line of the battery. You can also test the negative main line of the battery. When measuring the negative main line, just pay attention that the direction mark of the sensor points to the direction of the battery, and when measuring the positive main line, it points to the load direction.
Precautions:
1.The correct wiring of the sensor is: the coulomb meter shows a positive current when discharging, and a negative current when charging. If not, it means that your sensor is in reverse connection, you just change the wiring direction.
2.After wiring, if the meter can only display the positive current discharged, but not the negative current when charging, it means that the current you are charging does not pass the sensor. You need to check if the position measured by the sensor is accurate. It is recommended that the sensor be measured at all the main wires of the positive electrode or all the main wires of the negative electrode.
3.Please note that coulometer and sensor are not waterproof. Please keep it away from water, otherwise they will be damaged.