| Quantity | 3+ units | 10+ units | 30+ units | 50+ units | More |
|---|---|---|---|---|---|
| Price /Unit | $53.26 | $52.18 | $50.55 | $48.37 | Contact US |
 Black Shell T-Embed-CC1101 Plus ESP32-S3 Development Board NRF24L01 2.4GHz ISM Transceiver with 1.9-inch LCD
$88.55
Black Shell T-Embed-CC1101 Plus ESP32-S3 Development Board NRF24L01 2.4GHz ISM Transceiver with 1.9-inch LCD
$88.55
 Transparent Shell T-Embed-CC1101 Plus ESP32-S3 Development Board NRF24L01 2.4GHz ISM Transceiver with 1.9-inch LCD
$86.22
Transparent Shell T-Embed-CC1101 Plus ESP32-S3 Development Board NRF24L01 2.4GHz ISM Transceiver with 1.9-inch LCD
$86.22
 Black Shell T-Embed-CC1101 ESP32-S3 Development Board 2.4G WiFi PN532 Module with 1.9-inch LCD
$81.55
Black Shell T-Embed-CC1101 ESP32-S3 Development Board 2.4G WiFi PN532 Module with 1.9-inch LCD
$81.55
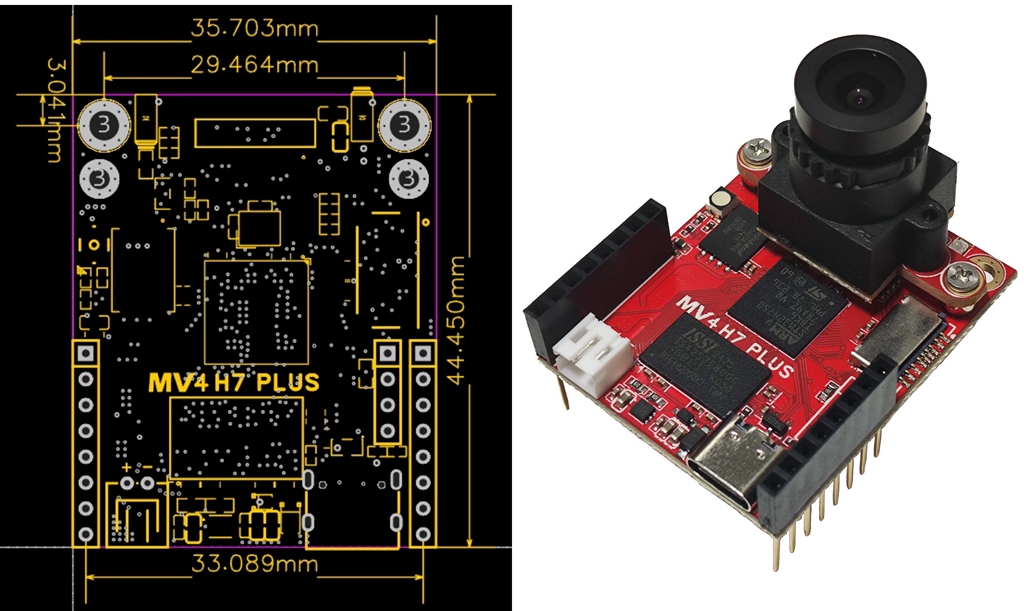
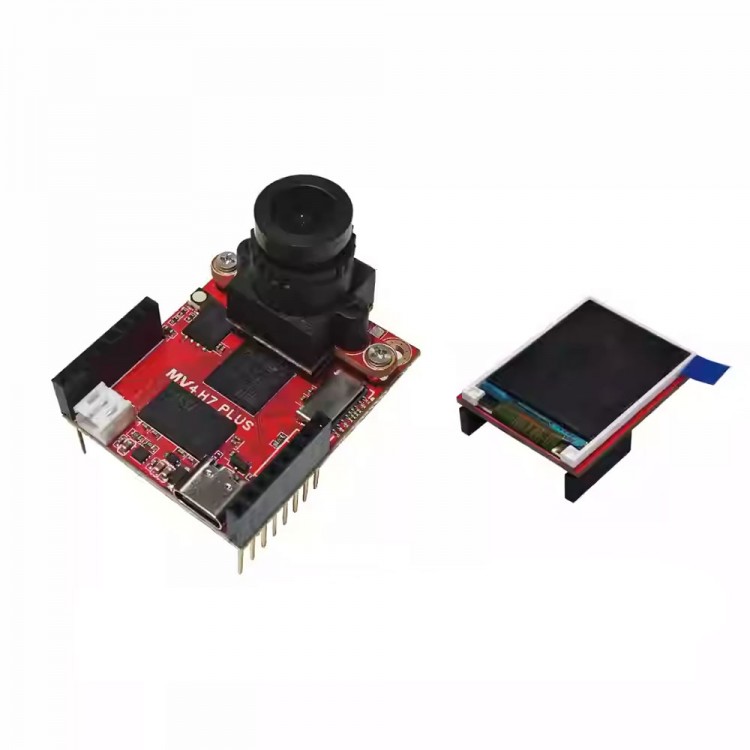
H7 Plus 5MP HD Smart Camera Module OV5640 Opensource Visual Module + LCD Expansion Module Compatible with OpenMV4 H7 Plus
Former Problems:
- Many users have reported that it is particularly prone to burning, manifested by the high temperature of the microcontroller and the 3.3V voltage being pulled down. Through analysis of multiple chips, the reason is that the IO port of the microcontroller is broken down and short circuited to ground.
- The Micro USB interface is prone to dropping, often during car debugging, when the car moves, the USB port drops directly.
- The original designed VIN input range was 3.6V ~ 5.2V, and batteries with higher voltages used on some platforms require secondary voltage reduction.
- Many users have asked why the program has no issues during debugging, but there are problems when running offline. After analyzing from multiple aspects, the reason is that the platform's power supply current is not enough. Although the static input is 5V, the voltage drops during operation due to the consumption of current. The microcontroller appears to be running under voltage, but the program is already disordered.
Improvement:
- All external IO ports have been equipped with separate ESD tubes.
- Replace the Micro USB port with a Type-C interface.
- Expanding the range of Vin to 3.6V-17V with minimal need for secondary voltage reduction.
- PG indicator has been added to the board. As long as the PG light is on, 3.3V is guaranteed to be within a 5% error range, providing a little convenience for troubleshooting.
For activation code KEY:
- For products without KEY activation, there will be 3 pop ups prompting you to activate when connecting to the IDE. You need to manually close the pop ups. After closing the pop ups, all functions can be used normally. After activation, there will be no pop-up window. Purchasing activation code KEY activation is a support for OPENMV open source authors, you can purchase the activation KEY if you like.
Features:
- OV5640 sensor module added, compatible with OpenMV4.
- Track the firmware source code, submit the code to the firmware, and also design some easy-to-use tips
- The board upgraded to be with genuine key, which eliminates the trouble of opening IDE reminders
- SDRAM and FLASH have been expanded outside the module. Say goodbye to out of memory. At the same time, the code is stored in the qspi flash to deal with high-intensity vibration
Functions:
- STM32H7xxII for ARM Cortex M7 processor runs at 480 MHz and has 1MB of RAM and 2MB of flash memory. All I/O pins output 3.3V voltage and can withstand 5V voltage. The processor has the following I/O interfaces: Full-speed USB (12Mbs) interface with computer. When plugged in, your open source camera module will appear as a virtual COM port and USB flash drive
- SD card slot has a read/write capacity of 100Mbs, allowing your open source camera module to record video and easily unplug machine vision assets from a SD card (not included)
- A SPI bus that can run up to 100Mbs allows you to easily stream image data from the system to LCD Shield, WiFi Shield or other micro-controllers
- I2C bus, CAN bus and asynchronous serial bus (TX/RX) are used to interface with other micro-controllers and sensors
- A 12-bit ADC and a 12-bit DAC
- Two I/O pins are used for servo control
- Interrupt and PWM on all I/O pins (there are 10 I/O pins on the board)
- And, one RGB LED and two high-power 850nm infrared LEDs.
- 32MB external 32-bit SDRAM with a clock frequency of 100 MHz and a bandwidth of 400 MB/s
- In 4-bit DDR mode, 32 MB external Quadspi flash memory (16 MB available now) is provided at a frequency of 100 MHz with a bandwidth of 100 MB/s
- Upgraded distortion free lens, focal length: 2.8mm, size: 1/2.5", HFOV=100°, VFOV=80°, distortion coefficient: about 3%.
A movable camera module system that allows to interface with different sensors:
- The PLUS Version has an OV5640 image sensor, capable of shooting 2592x1944 (5MP) images. The simple algorithm will run at 30 FPS or more at QVGA (320x240) resolution and below. Your image sensor comes with a 2.8mm lens on a standard M12 lens mount. If you want to use more professional lenses in the image sensor, you can buy and install them by yourselves.
- For professional machine vision applications, you can purchase our global shutter camera module.
- For thermomechanical vision applications, you can purchase our adapter module for FLIR Lepton.
Applications:
- Frame difference: Detect movement in the scene by looking at the changes. The frame difference allows you to use it for security applications.
- Color tracking: Detect 16 more colors in the image at once (in fact, you never want to find more than 4 colors), and each color can have any number of different spots. Then, tell you the location, size, center of mass and direction of each spot. Using color tracking, you can program to perform tasks such as tracking the sun, tracking a straight line, and target tracking.
- Tag tracking: You can detect color groups instead of individual colors. This allows you to create color makers (2 or more color labels) that can be placed on the object so that you can understand what the marked object is.
- Face Detection: You can (or any general object) detect human faces. It can handle Haar cascade for regular object detection, and comes with built-in Front Face Face Cascade and Eye Haar Cascade to detect faces and eyes.
- Eye tracking: You can use eye tracking together to detect someone's line of sight. Then you can use it to control the robot. Eye tracking can detect where the pupils are, instead of detecting whether there are eyes in the image.
- People detection: You can use our built-in person detector TensorFlow Lite model to detect whether there is a person in the field of view. The video demo is here.
- Light flow: You can use optical flow detection. For example, you can use optical flow on a quadcopter to determine its stability in the air.
- QR code detection/decoding: You can read the QR code in its field of view. With QR code detection/decoding, you can create an intelligent robot that can read tags in the environment.
- Data matrix detection/decoding: It can also detect and decode data matrix two-dimensional barcodes. You can view a video about this feature here.
- Linear barcode decoding: It can also decode one-dimensional linear barcodes. In particular, it can decode EAN2, EAN5, EAN8, UPCE, ISBN10, UPCA, EAN13, ISBN13, I25, DATABAR, DARABAR_EXP, CODABAR, CODE39, CODE93 and CODE128 barcodes.
- April tag: Better than the above QR code, it can also track AprilTags. AprilTags are tags for rotation, scaling, clipping, and lighting unchanged.
- Line detection: Infinite line detection can be completed quickly. And, you can also find line segments of non-infinite length. You can watch our video about this feature here. In addition, we support running linear regression on the image for subsequent applications such as DIY Robot car.
- Circle detection: You can easily detect the circles in the image.
- Rectangle detection: You can also use our AprilTag library's quaternary detector code to detect rectangles.
- Template matching: You can use templates together to detect when to display translated pre-saved images. For example, template matching can be used to find a reference point on the PCB or to read a known number on the display.
- Image collection: You can collect grayscale/RGB565 BMP/JPG/PPM/PGM images. You can directly control how to get images in scripts for Python. The important thing is that you can perform machine vision functions and/or draw on the frame before saving.
- Video recording: You can record more grayscale/RGB565 MJPEG video or GIF image (or RAW video). You can directly control how to record each frame of the video in a Python script, and you can completely control the start and end of the video recording. And, just like capturing an image, you can perform machine vision functions and/or draw the video frame before saving it.
- TensorFlow Lite supports microcontrollers: TensorFlow Lite supports enabling you to run custom image classification and segmentation models. With TensorFlow Lite support, you can easily view the complex areas of interest in the view and control the I/O pins based on what you see. For more information, see TensorFlow module.
- All the above functions can be mixed and matched together with I/O pin control in your own custom application to talk to the real world.
Package Included:
- 1 x Set of Camera Module
- 1 x LCD Module
About Firmware:
- The version number for OPENMV IDE on the official website is 4.4.4, which is currently the latest version (2024/12/1). Corresponding to the latest firmware 4.5.9, there is a strong matching relationship between firmware number and IDE version number, and old firmware cannot be used for the latest version of IDE! For example, when connecting firmware 4.5.6 to OPENMV IDE 4.4.4 version, there may be a "busy" situation where the connection cannot be made.
- The factory firmware version number of this product OPENMV is 4.5.9, compatible with IDE 4.4.4 downloaded from the official website.
Q: What are the differences between different firmware? Which firmware is the best to use?
A: Some functions in different firmware have different usage. Taking 4.5.6 as the watershed, firmware neural network libraries below 4.5.6 use the tf library. In firmware versions 4.5.7 and above, the tf library has been removed and replaced with the ml library.
In addition, the AprilTag routine has also undergone significant modifications. All tutorials (or CSDN maker code) on the official website are previously written and filmed videos, and the tutorials are based on old firmware. Therefore, some tutorials on using new firmware may encounter issues such as code mismatch and errors between the tutorial and actual operation. Therefore, it is necessary to choose firmware 4.5.6 or 4.5.9 according to one's own project requirements.
Q: My project requires firmware 4.5.6, but accidentally upgraded to the latest 4.5.9 firmware. How can I revert back to firmware 4.5.6?
A: You can flash the firmware using the corresponding version of IDE. For example, if I need to use firmware 4.5.6 and the corresponding IDE version is 4.2.0, I need to uninstall the original new version of the IDE first, then install version 4.2.0 of the IDE, and then use the IDE to flash the corresponding best firmware. The method of upgrading firmware can refer to the following simple methods:
(1) Disconnects for OPENMV and computer USB connection.
(2) Click the connection button in the bottom left corner of OPENMV IDE, and "OPENMV not found" will appear. Click the OK button.
(3) Pop up "Has the brick changed?", click "Yes".
(4) At this point, you need to select the OPENMV model, choose the model with the H7 PLUS suffix (if it is the H7 R2 version, choose the H7 suffix), and click the OK button.
(5) Pop up "Do you want to erase internal file system", click "No".
(6) At this point, a prompt window appears. Use a USB cable to connect OPENMV to the computer and patiently wait for the IDE to automatically flash the firmware.
The installation package for OPENMV IDE 4.2.0 and 4.5.6 firmware files can be accessed from a cloud drive.
- Link: https://pan.baidu.com/s/17JOkxh8At4y8k7oqDAiR0w (The "O" in 17JO is capitalized as the English letter O, not zero; The '0' in the final iROw is the number zero)
- Extract code: k1u8
Q: After rolling back the IDE from 4.4.4 to 4.2.0, an error message "Error: The system cannot find the specified folder" appears. How can I solve this problem?
A: After uninstalling IDE 4.4.4, if the registry on the system is not cleared, this problem may occur. After rolling back the IDE version, it is recommended to perform the following reset operations: https://blog.csdn.net/weixin_45479272/article/details/144615295?spm=1001.2014.3001.5501
You can also search in CSDN for "Error: System cannot find specified folder after OPENMV IDE rollback version" to find this article.