| Quantity | 3+ units | 10+ units | 30+ units | 50+ units | More |
|---|---|---|---|---|---|
| Price /Unit | $31.80 | $31.15 | $30.18 | $28.88 | Contact US |
 Black 3D-Printed Mini ESP32 Marauder Development Board Positioning Module with 1.44-inch Screen
$33.36
Black 3D-Printed Mini ESP32 Marauder Development Board Positioning Module with 1.44-inch Screen
$33.36
 White 3D-Printed Mini ESP32 Marauder Development Board Positioning Module with 1.44-inch Screen
$33.36
White 3D-Printed Mini ESP32 Marauder Development Board Positioning Module with 1.44-inch Screen
$33.36
 MPSoC XCZU19EG-F V0.3 AMR+FPGA Development Board Kit QSFP28 10Gbps Ethernet PCIE3.0 Support for Windows/Linux Systems
$1,537.98
MPSoC XCZU19EG-F V0.3 AMR+FPGA Development Board Kit QSFP28 10Gbps Ethernet PCIE3.0 Support for Windows/Linux Systems
$1,537.98
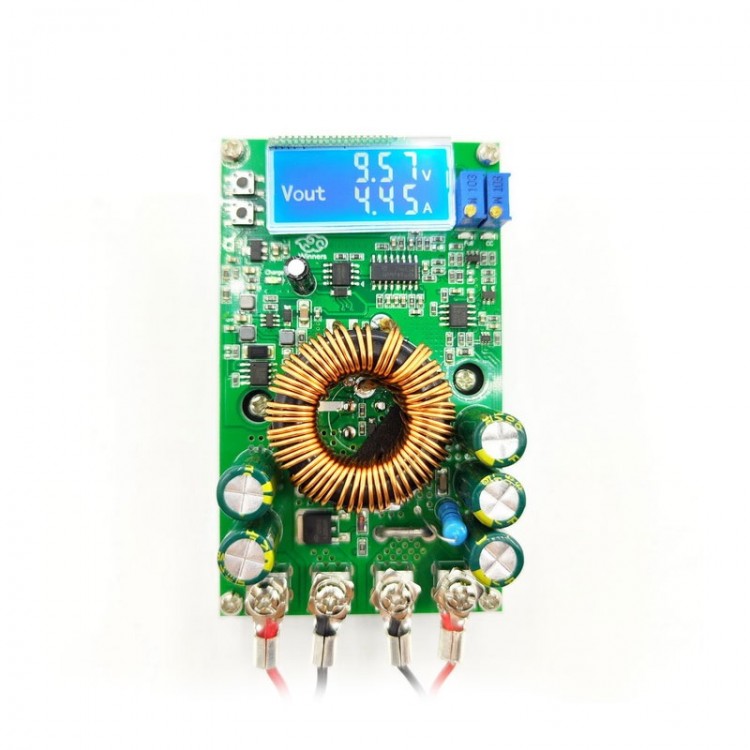
WD3620 20A DC-DC 300W High Power 0-36V Adjustable Step-down Power Supply Module + 72V 20A Anti-reflux Diode
Calibration Method:
- This module has a calibration function, so you don't have to worry about inaccurate measurement display. Just calibrate it once! By default, the product has been calibrated before leaving the factory. If you receive a product that is not accurate, you can use the following method to perform a calibration once.
Voltage Calibration:
- Under no-load and power-off conditions, hold down the "+" button and do not release it. Power on and enter the voltage calibration mode. The LCD screen starts flashing. Release the "+" button and press the "+" "-” button to add or subtract. Calibrate to the correct input terminal voltage. For example, if the input voltage is 12.65V, adjust the current voltage to 12.65V. After 2 seconds, it will be automatically saved. When the power is turned off, the calibration is complete.
Special Note:
- The reason why the output voltage cannot be adjusted is because the module is shipped with a default output voltage of around 20V. When you encounter this problem, please rotate the CV potentiometer counterclockwise for more than 10 turns until the voltage value changes, and then use the module to adjust the voltage normally.
Diode Specification:
- Type: anti-reflux diode, anti-backflow diode
- Peak repetitive reverse voltage: 72V
- Load current: 20A
- Product size: 83 x 40 x 33mm
- Hole space: 55 x 30mm
- Net weight: 75g
- Note:
Equipped with a large heat sink, this diode has a voltage drop of about 0.3V-0.6V. Please adjust the high voltage difference for charging voltage output.
When used to prevent backflow during charging at the output end, it does not also have the function of preventing reverse connection, so do not reverse the battery connection.
Step-down Module Specification:
- Input voltage: DC 7 - 50V
- Output voltage: DC 0 - 36V constantly adjustable (it can only be used as step-down module, and the input must be 2V larger or above than output)
- Output current: 0 - 20A adjustable, peak value 20A (it is recommended to use within 15A
- Output power: maximum 300W (it is recommended to use within 250W, please decrease the voltage for large voltage difference use)
- Working temperature: -20 ~ 75℃(pay attention to heat dissipation)
- Conversion efficiency: up to 95%
- Short circuit protection: yes, the constant current value currently set by the constant current
- Input reverse polarity protection: yes
- Output reverse flow: no, please add a diode (not included) for charging and motor type
- Wiring method: wiring terminal or welding terminal, VIN is input, VOUT is output
- Module size: 100mm x 60mm x 48mm
- Net weight: 210g
Setting Description:
- The "+" key can be used to set the display mode, which is divided into three types:
1. F-0 mode: display output voltage
2. F-1 mode: display input voltage
3. F-2 mode: alternate display of input and output voltage
- Instructions for use: press the "+" key to cycle through three display modes, press the "-" key to save and exit, and press the "-" key alone to turn on and off the backlight of the LCD screen.
Application:
Note that the constant current adjustable current mode only operates when the actual load output current is greater than the set current. Otherwise, it will work in a constant voltage state, and not when the current is adjusted to 2A, or when any device is connected, it will change to 2A.
1. Used as a common step-down module with overcurrent protection capability.
Using method:
(1) Under no-load conditions, adjust the "voltage potentiometer" to achieve the desired output voltage value.
(2) Connect the load and ensure that the wires are thick enough. Adjust the "current potentiometer" counterclockwise to decrease it. The default factory setting is 10A. If it is actually necessary to lower it below 10A, the current display needs to be counterclockwise adjusted a few more turns to show a change. (If the current value displayed on the ammeter is 4A, then the maximum current of the module is limited to 4A. When the current reaches 4A, the constant current indicator light will turn on in red.)
2. Used as a battery charger.
Using method:
- Important note: for charging batteries and connecting motors, remember to add a diode (additional purchase) at the output end of the module to prevent backflow. If no backflow is added, the tube will burn out.
(1) Determine the float charge and charging current of the battery. (If the parameters of the lithium battery are 3.7V/2200mAh, then the float charge voltage is 4.2V and the maximum charging current is 1C, which is 2200mA.)
(2) Under no-load conditions, adjust the "voltage potentiometer" to make the output voltage reach the float charge voltage.
(3) The battery is connected to the back end of the anti-reflux diode. Connect the battery and ensure that the wires are thick enough. Adjust the "current potentiometer" to reduce the reverse clock. The default factory setting is 10A. If it needs to be lower than 10A, you need to reverse the clock a few more times to display the current. (The current value displayed on the ammeter is 4A, so the maximum current of the module is limited to 4A. When the current reaches 4A, the constant current indicator light and the red indicator light will turn on.)
(4) When charging, turn to the full charge light condition: When the actual current is 0.1 times the set current, turn to the full charge light; When charging with constant current, both the constant current indicator light and the charging light are on at the same time. The current of the battery gradually decreases during the charging process, gradually shifting from constant current charging to constant voltage charging. The fully charged light is on. If the charging current is set to 5A, when the charging current is less than 0.5A, the blue light of the fully charged indicator light will light up, indicating that the battery is fully charged.
3. Used as a constant current LED driver module.
Using method:
(1) Determine the operating current and maximum operating voltage required to drive the LED.
(2) Under no-load conditions, adjust the "voltage potentiometer" to achieve the LED working voltage output.
(3) Connect the LED load and ensure that the wires are thick enough. Adjust the "current potentiometer" counterclockwise to decrease it. The default factory setting is 10A. If it is actually necessary to lower it below 10A, the current display needs to be counterclockwise adjusted a few more turns to show a change. The current value displayed on the ammeter is 4A, so the maximum current of the module is limited to 4A. When the current reaches 4A, the constant current indicator light will turn on in red.
Package Included:
- 1 x Step-down Power Module
- 1 x Anti-reflux Diode
Note:
- Battery is not included.