| Quantity | 3+ units | 10+ units | 30+ units | 50+ units | More |
|---|---|---|---|---|---|
| Price /Unit | $44.30 | $43.39 | $42.04 | $40.23 | Contact US |
 Secondhand Imported UP19K-50L-H5 Laser Power Energy Meter 90W/15J Rang & Software Display for GENTEC
$538.14
 F999M Portable Professional Leakage Detector for Water Pipes/Heating Pipes/Fire Hoses Leakage Detection
$498.30
 F999K Portable Leakage Detector for Water Pipes/Heating Pipes/Fire Hoses Leakage Detection with Pointer Spectrum Display
$342.83
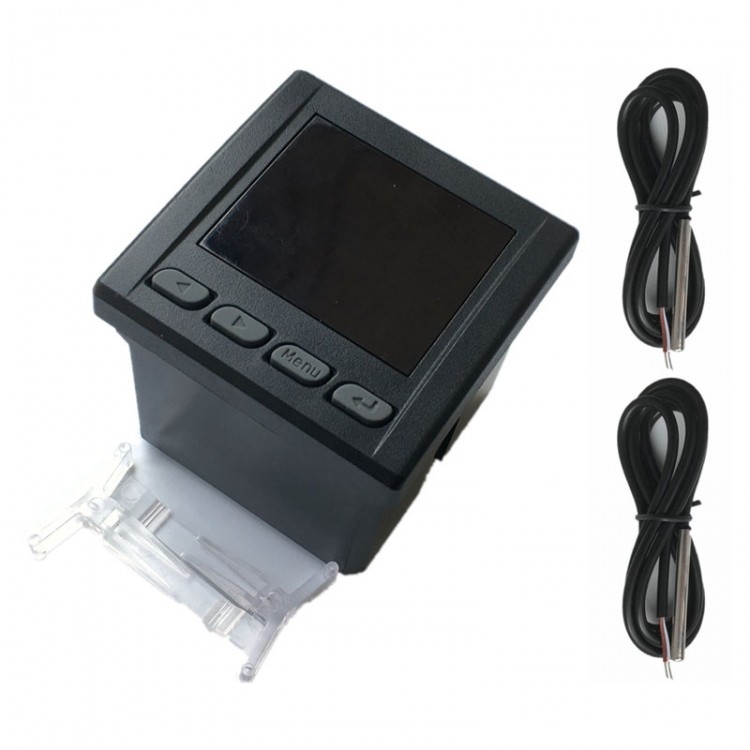
WF72TT Wifi Temperature Controller Digital Temperature Controller + Two 2M/6.6FT Waterproof Probes
Read Before Purchasing:
- WIFI thermostat is used by the network on the mobile phone to control the output. When setting or remote control, the controller must be set or controlled when the WIFI signal is better. The mobile phone must be connected to the Internet through WIFI, 3G or 4G and set the parameters.
- Setting up requires a certain amount of expertise, so please be patient. The product has been used in bulk. Please use it with ease.
- There is no paper user manual for the product, please refer to the following instructions for use.
Function Introduction:
WF72TT is a WIFI multi-function temperature controller. Temperature control can be achieved by connecting a temperature probe. Two probes can be connected to achieve dual-way temperature control or temperature difference control.
The product is suitable for various commercial and industrial occasions, such as the heating and refrigeration control of HVAC systems, hot water engineering, boilers, aquaculture, hatchery and intelligent electro-mechanical equipment.
The WF72TT is powered by a linear isolation transformer. It features high-performance dual processor inside. The control and WIFI sections each use two independent 32-bit processors. Due to its strong anti-interference ability, it is suitable for various harsh industrial occasions, which can ensure the stable, reliable and continuous operation of the controller.
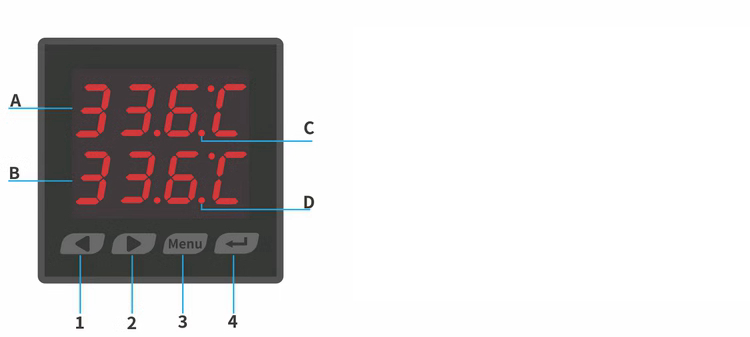
Control Panel:
Display interface:
A: Display the actual temperature of probe 1
B: Display the actual temperature of probe 2
C: CH1 relay output status indication. When the relay is closed, the indicator will flash.
D: CH2 relay output status indication. When the relay is closed, the indicator will flash.
Buttons:
1. CH1 manual switch or parameters setting. Short press the button and it will increase by 0.1; long press the button for quick increase.
2. CH2 manual switch or parameters setting. Short press the button and it will reduce by 0.1; long press the button for quick reduction.
3. Short press the button to enter menu settings.
4. Short press the button to exit the setup and return to working mode.
Technical Parameters:
- Dimensions: 83 x 72 x 72mm/3.3 x 2.8 x 2.8" (LxWxH)
- Installation: Drill hole to install
- Installation dimensions: 66.5 x 66.5mm/2.6 x 2.6"
- Working power supply and power consumption: AC220V; <2W
- Display mode: double row three-digit high-brightness digital tube display
- Temperature range: -39°C to 140°C
- Temperature control accuracy: ±1°C and resolution 0.1°C
- Output: 1. Two-way relay normally open and normally closed contact output; 2. The contact current capacity is resistive load 10A and inductive load 2A. It can control 2000W resistive load, 500W motor or water pump. Larger load needs to be expanded with AC contactor.
- Relay life: 1 million for on-off control
- Operating environment: -10°C to 50°C
- Parameter memory: Long-term memory of set parameters when there is power failure
Wiring:
- Terminal 1: CH1 is normally open
- Terminal 2: The common point of the CH1
- Terminal 3: CH1 is normally closed
- Terminals 4 and 5: Connect to the working power supply. Do not distinguish between positive and negative poles
- Terminal 6: CH2 is normally open
- Terminal 7: CH2 is normally closed
- Terminal 8: The common point of the CH2
- Terminals 9 and 11: to temperature probe 1 (regardless of positive and negative)
- Terminals 10 and 11: to temperature probe 2 (regardless of positive and negative)
Note: The output is a switching quantity and it has no voltage attribute. It is generally used to control the live wire of the load on and off. For 220V loads such as heating wires, the live wire enters from the common point and comes out from the normally open point and is connected to the live wire of the heating wire. The neutral line of the heating wire is directly connected to the 220V neutral line without passing through the instrument.
Control Modes:
- Connect a probe to control dual-way output. The temperature of one probe is collected. One-way output controls cooling and temperature increase. The working mode can be set for the two-way control. You can choose cooling, heating or alarm mode.
- Connect two probes to control the dual-way output. The temperature of the two probes is collected. One-way output controls cooling and heating. The two-way control can set the working modes, including cooling, heating, alarm and temperature difference modes.
Note: At this time, one-way output corresponds to the temperature of one probe, and the two-way output corresponds to the temperature of two probes or the temperature difference between the two probes. That is, the controller is equivalent to two independent single-channel thermostats or a thermostat plus a temperature difference controller.
Cooling and Heating Modes:
- Cooling mode. When the start-up temperature is larger than the stop temperature, it works in cooling mode. When the actual temperature ≥ the start-up temperature, the relay will turn on. When the actual temperature ≤ stop temperature, the relay will shut down. For example, the start value is set to 39°C and the stop value is set to 25°C. When the temperature ≥ 39°C, the device will start to cool. When the temperature drops to 25°C, the device stops cooling. When the temperature rises to 39°C, the equipment starts to cool again.
- Heating mode. When the starting temperature is smaller than the stop temperature, it works in heating mode, that is, when the actual temperature ≤ the starting temperature, the relay turns on. When the actual temperature ≥ stop the temperature, the relay shuts down. For example: if the starting temperature is set to 30°C and the stop temperature is set to 39°C, the temperature will start heating when the temperature ≤ 30°C, and when the temperature rises to 39°C, the device will stop heating. When the temperature reaches 30°C, the device starts heating up again.
Manual Temperature Control:
- Users can manually turn the output on or off only if the temperature or temperature difference is between the stop value and the start value.
Error Code:
- When the CH1 and CH2 sensors are short-circuited or open-circuited, the screen will display E4OC.
Features:
- The controller and phone APP can display real-time temperature and output status.
- Set parameters via the controller or phone APP. The controller can run independently without WIFI.
- Output can be turned on or off manually remotely or on-site (when the set value is not reached).
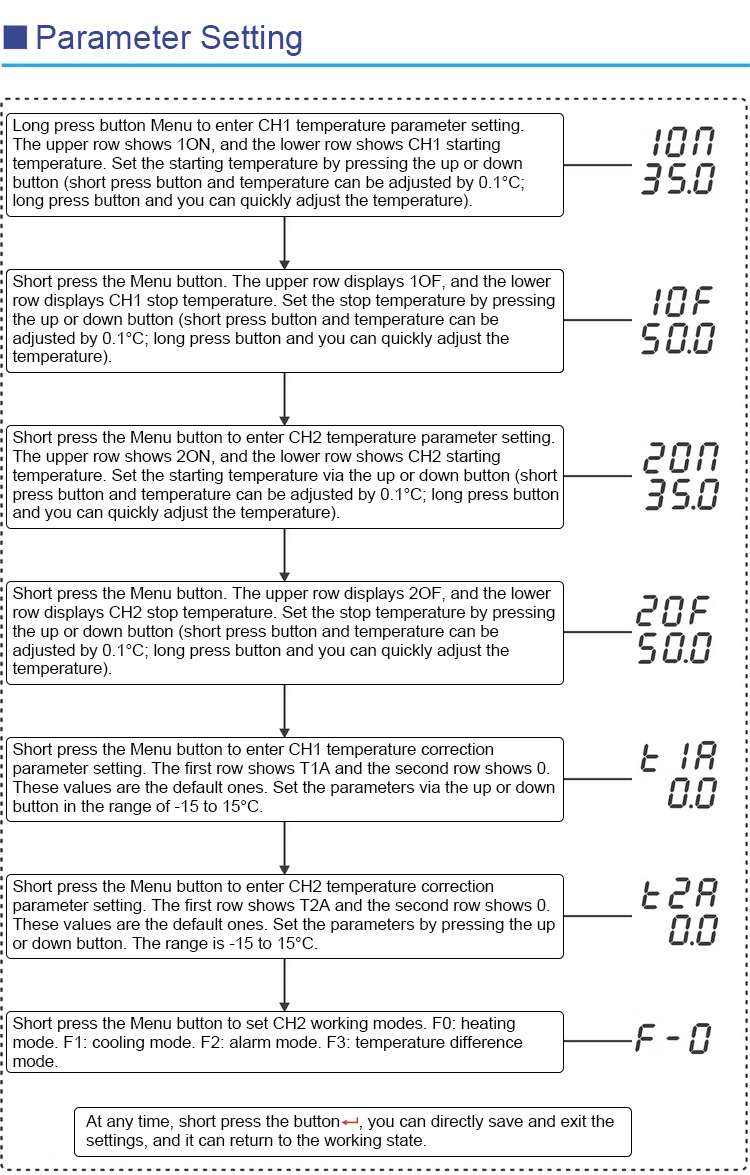
- Cooling and heating can be set for CH1 temperature control. And working modes of CH2 can be set: F0: heating, F1: cooling, F2: alarm and F3: temperature difference.
- Push high and low temperature alarms through the APP.
- The controller and phone APP support temperature calibration.
- APP can display parameters such as the actual temperature, start temperature, stop temperature, and upper and lower limits of alarm temperature.
- The master account can share the device with other people. The device can only be added to one master account
Attention:
- The controller and mobile phone should be online to realize alarms.
Configuration Process:
1. Installation preparation:
- Search for Tuya Smart in the app market for Android phones and download and install the APP.
- Search for Tuya Smart in the App Store for iPhone and install the APP.
- After installing the app, please use your mobile phone or email to register an account.
- Note that if you are using a phone for Android, please use the default font of the system, otherwise the display page will be confused.
2. Add mobile app:
1. Connect the wire according to the wiring diagram. After the first power on, the device will enter the WIFI configuration mode by default. (Note: If the device has been added to the APP and needs to be reconfigured, you need to press and hold the configuration button before powering on, and then not release the button until the digital tube displays the circular running light. At this point, the device will enter WIFI configuration mode.)
2. Open the APP and click the "+" icon in the upper right corner to select any device.
3. Click "Confirm that the indicator is flashing" on the APP.
4. Prompt: Choose a wifi that can access the Internet normally and enter the password, confirm the password and enter it correctly, and click "OK".
4.1 The device uses 2.4G wifi communication protocol and does not support 5G networks at the moment.
4.2 If the network is set to hide or filter MAC addresses, please ask the network administrator to enter the background to modify the settings and then add the device.
5. APP starts configuration automatically, and a 100% progress bar indicates that the device was successfully added.
6. After the addition is successful, users can rename the device.
Note:
- After the device is successfully added, if it is reconfigured, the device will be automatically removed from the current app.
- When using the alarm, the corresponding push permission of the Tuya APP in the mobile phone must be turned on, otherwise the alarm push will be blocked. When the alarm message is pushed, there is a prompt tone of about 30 seconds.
Package Included:
- 1 x Temperature Controller
- 2 x Temperature Probes
Note:
- The input voltages are 220V and 12V. Please choose the input voltage you want while purchasing.