| Quantity | 3+ units | 10+ units | 30+ units | 50+ units | More |
|---|---|---|---|---|---|
| Price /Unit | $6.54 | $6.40 | $6.20 | $5.94 | Contact US |
 NRF24+ESP32 Multifunctional Expansion Module WiFi 3-IN-1 Modification Module for Flipper Zero
$47.94
 1PCS 1:14 RC Model Excavator Tractor Dome Light Engineering Working 360-degree Warning LED Light
$12.63
 Netherlands Module Hypex NC252MP Power Amplifier Board 2x250W 2-Channel Audio Amplifier Module
$481.46
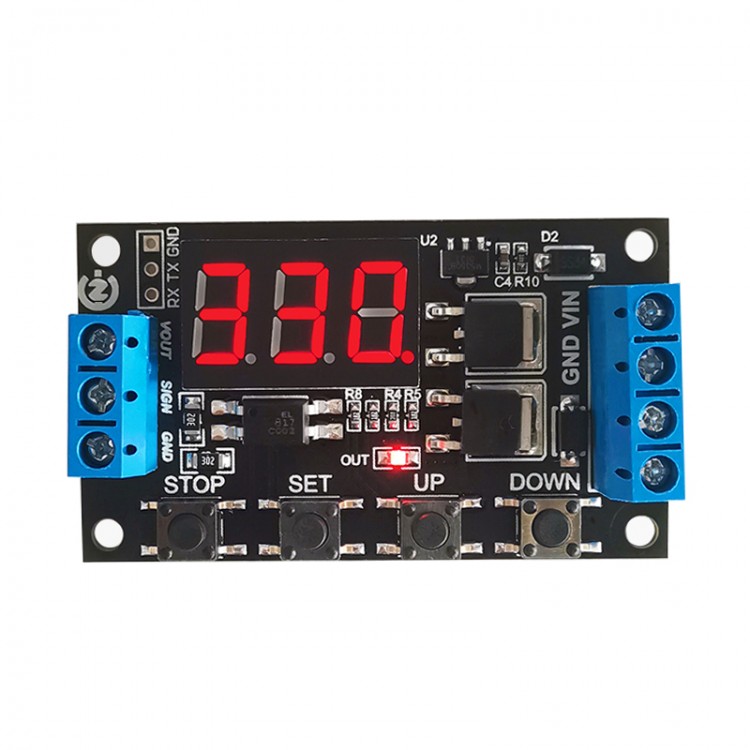
ZK-TD4 MOS Switch Type Trigger Cycle Timing Delay Module Solenoid Valve Control 5V12V24V For DIY Use
Optional Versions:
- Version with terminals are in Black.
- Version without terminals are in Dark Gray.
Note: Please choose the versions you want when purchasing. Thank you!
Features & Applications:
1. Realize circuit high frequency fast and frequent on and off, unlimited switching times;
2. No noise, no electric spark, no electromagnetic interference during the on-off process;
3. The service life is longer than that of common electromagnetic relays;
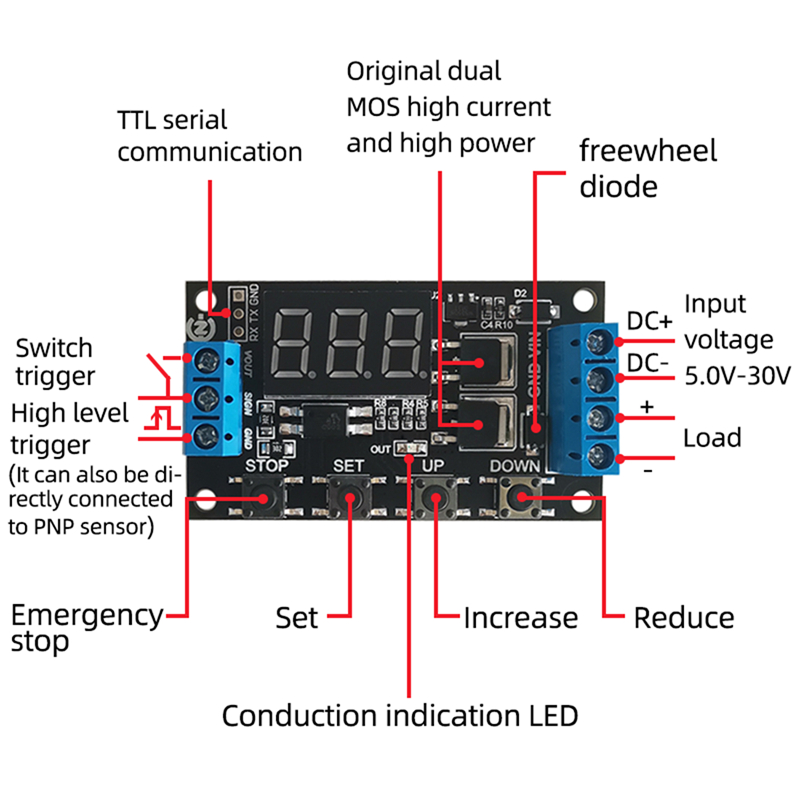
4. Adopt dual MOS parallel active output, lower internal resistance, larger current, strong power, 15A, 400W at room temperature, which meets the use of most equipment;
5. It is often used to control motors, light bulbs, LED strips, DC motors, micro water pumps, solenoid valves, etc. Through this module, these devices can be easily controlled, which is very convenient.
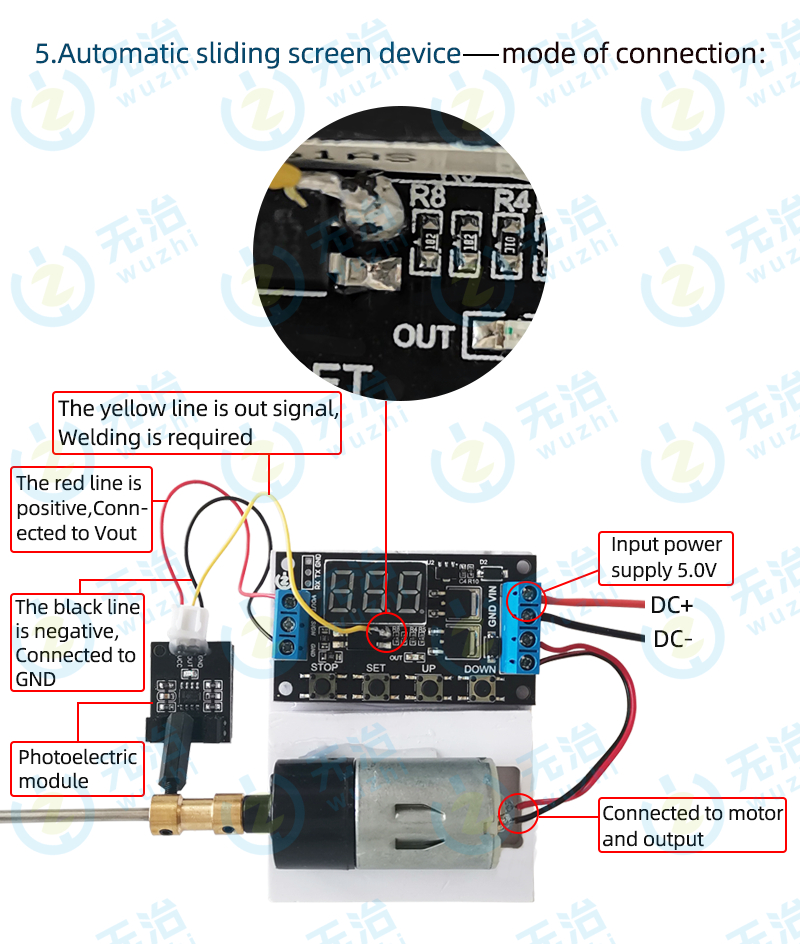
6. Suitable for TikTok. It can automatically swipe your screen, read and turn pages to browse videos on platforms for TikTok and Kuaishou, etc.
Highlights:
1. Wide voltage operation (5~30V), most equipment can be used, very convenient;
2. The interface is clear and simple, powerful, easy to understand, and almost meet all your needs;
3. There is a key emergency stop function (STOP key), with reverse connection protection, reverse connection does not burn;
4. Sleep mode, after enabling, without any operation within 3 minutes, the display will be turned off automatically; Any key to wake up;
5. Different OP, CL, LOP, CLL, CLH, SP parameters can be set, these parameters are independent of each other and saved separately;
6. Added automatic random swipe function for TikTok.
7. Added serial port communication function to facilitate reading and setting parameters.
8. All set parameters are automatically saved after power-off.
Package Included:
- 1 x Time Delay Module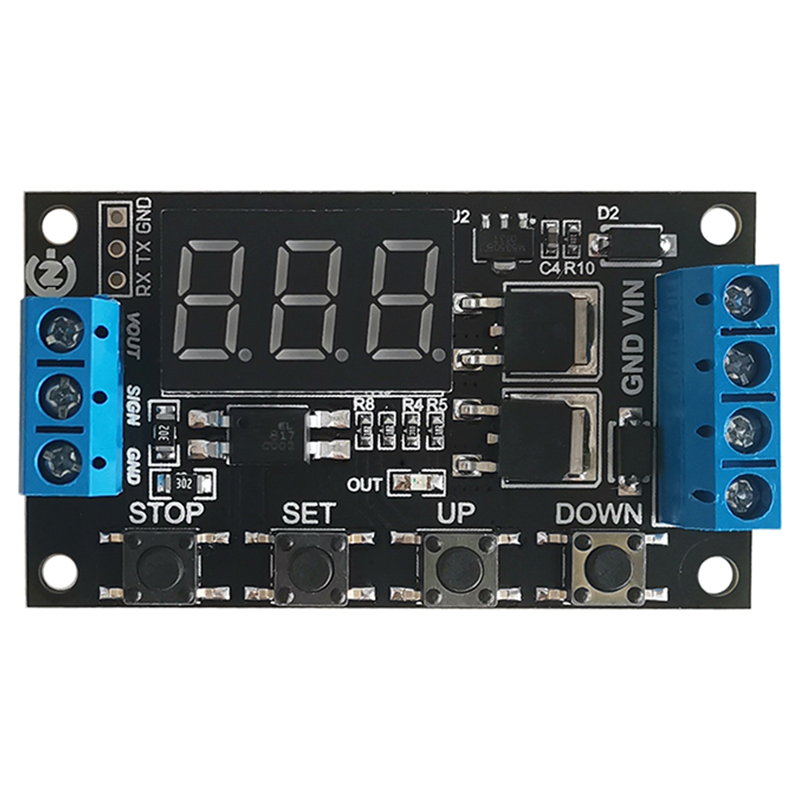
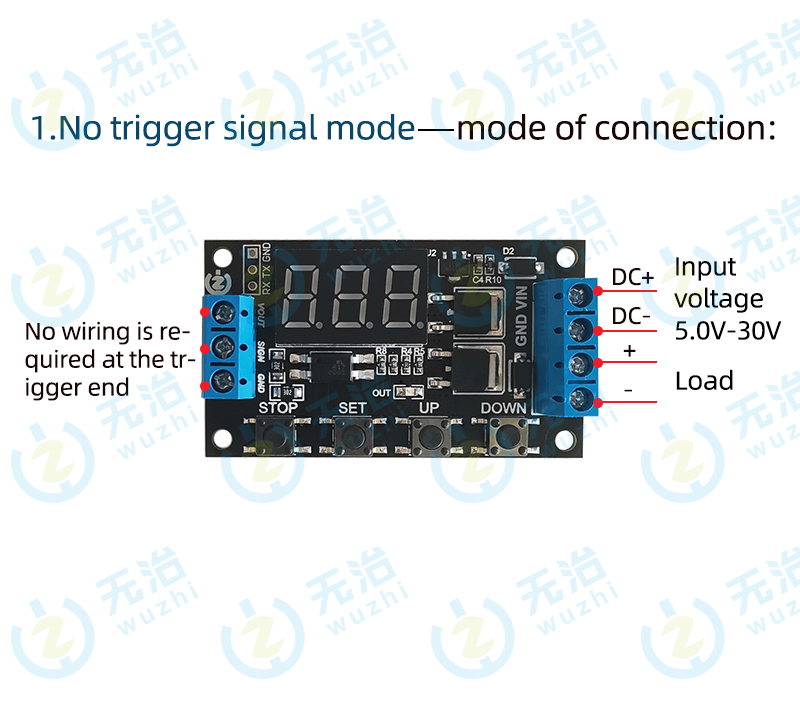
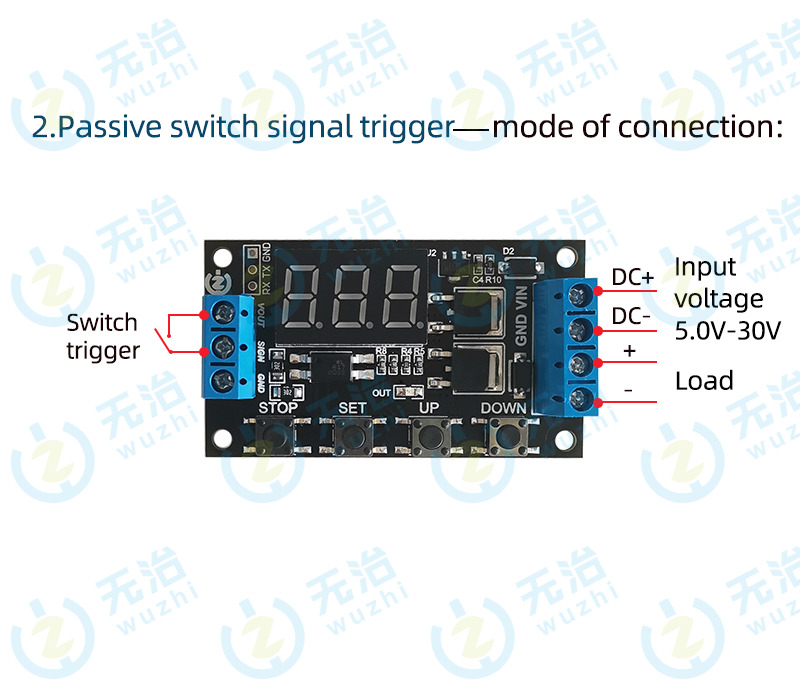
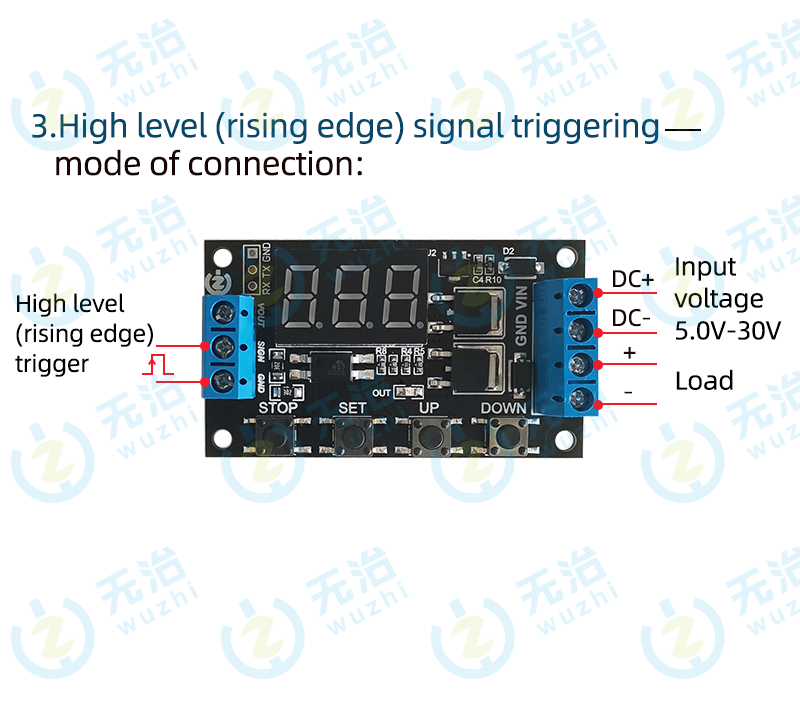
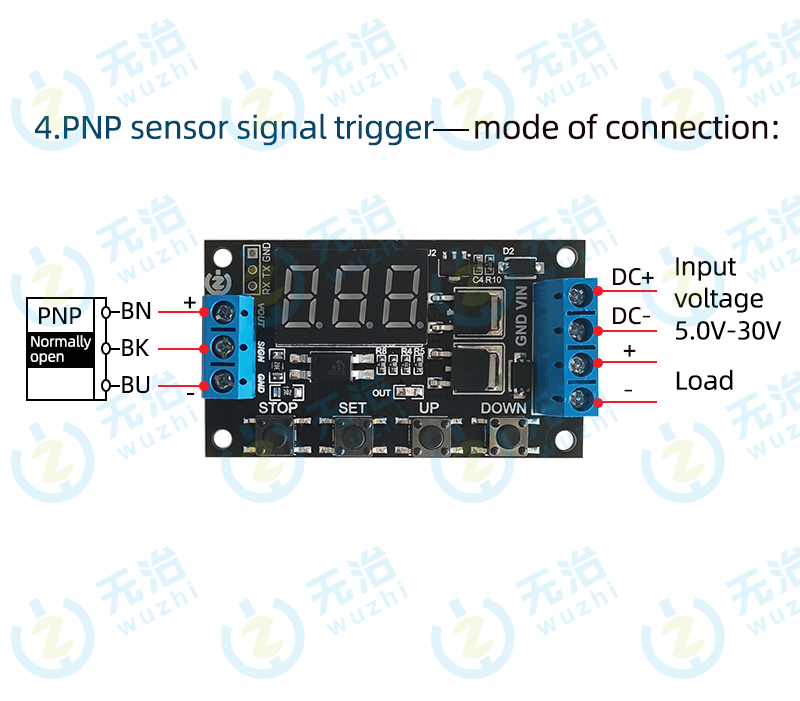
Operating Modes:
1. Mode without triggering:
P0: After the module is power on, the relay is de-energized CL time, the relay is activated.
P1: After the module is power on, the relay is on for OP time, and the relay is off.
P2: There is no need to trigger signal after power-on, the relay is on for OP time, the relay is off for CL time, and the above actions are cycled; the number of cycles (LOP) can be set; when the cycle is over, keep the relay off;
P3: There is no need to trigger signal after power-on, the relay is off CL time, the relay is on OP time, the above actions are cycled; the number of cycles (LOP) can be set; the cycle ends, keep the relay on.
2. The mode to be triggered:
P4: After the signal is triggered, the relay is turned on for OP time and then off; within the OP time, the signal is triggered again invalid
P5: After the signal is triggered, the relay is turned on for OP time and then off; within the OP time, the signal is triggered again to re-timing
P6: After the signal is triggered, the relay is turned on for OP time and then turned off; within the OP time, the signal triggers reset again, the relay is turned off, and the timing stops
P7: After the signal is triggered, the relay is disconnected for CL time, and then the relay is turned on
P8: After the signal is triggered, the relay is disconnected for CL time, and the relay is turned on for OP time. After the timing is completed, the relay is disconnected; another signal trigger in the cycle is invalid
P9: After the signal is triggered, the relay is disconnected for CL time, and the relay is on for OP time. After the timing is completed, the relay is disconnected; the signal is triggered again in the cycle, and the timing is restarted
P10: After the signal is triggered, the relay is disconnected for CL time, and the relay is turned on for OP time, then cycle the above actions, give the signal again in the cycle, restore the initial state, and stop timing; the number of cycles (LOP) can be set; the cycle ends, keep the relay conducting through
P11: After the signal is triggered, the relay is turned on for OP time and the relay is turned off for CL time, then cycle the above actions, give the signal again in the cycle, restore the initial state, and stop timing; the number of cycles (LOP) can be set; the cycle ends, keep the relay off open
P12: After the signal is triggered, the relay is turned on for OP time, the relay is turned off for CL time, and then the above actions are cycled, the signal is invalid again within the cycle; the number of cycles (LOP) can be set; the cycle ends, keep the relay off
P13: Signal holding function, if there is a trigger signal, the timer is cleared and the relay remains on; when the signal disappears, the relay is disconnected after timing the OP; during the timing, there is another signal, and the timer is cleared
P14: Signal hold function, if there is a trigger signal, the timer is cleared and the relay remains off; when the signal disappears, the relay is turned on after timing CL; during the timing, there is another signal, and the timer is cleared
3. Screen refresh mode for TikTok:
P15: After the signal is triggered, the relay is disconnected for L~H time (for example, L=10, H=15, then the relay disconnection time is a random number between 10-15 seconds, L and H are set in 0.0-99.9 seconds, and H is greater than or equal to L), the relay is turned on after the off time ends, and the motor can be driven to rotate at the speed SP gear (frequency 600hz, gear 0-16 corresponds to duty ratio 20, 25, 30...100)
Product Parameters:
1: Working voltage: DC5V-30V;
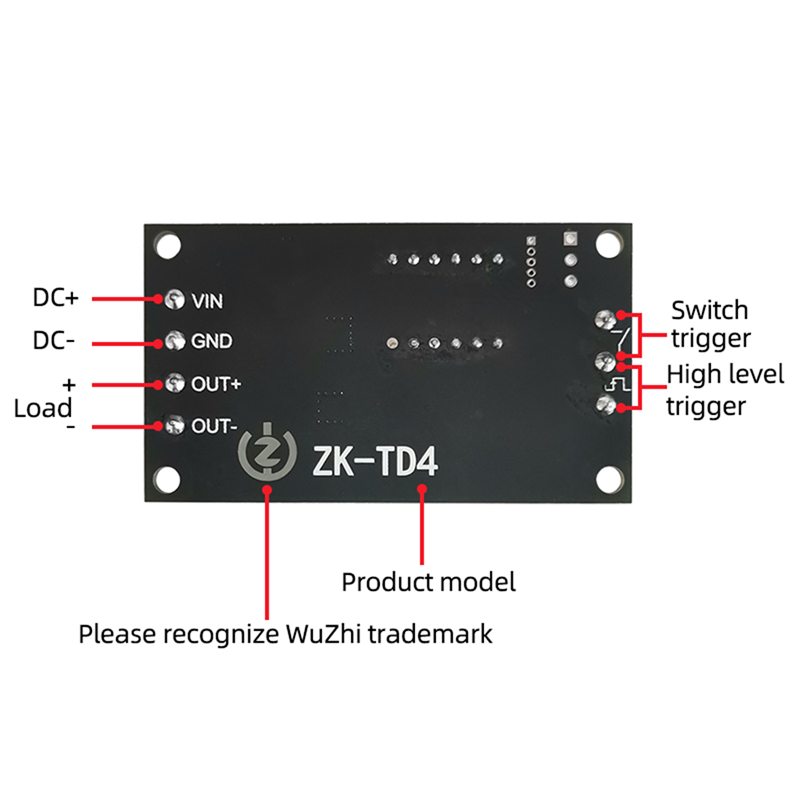
2: Trigger signal source: high level trigger (DC3.0V-24V) The signal ground and the system ground are not in the same ground to improve the anti-interference ability of the system (also can be short-circuited to the common ground)
3: Output capacity: DC DC5V--30V, continuous current 15A at room temperature, power 400W! Under auxiliary cooling conditions, the maximum current can reach 30A.
4: Quiescent current: 20mA working current: 50mA
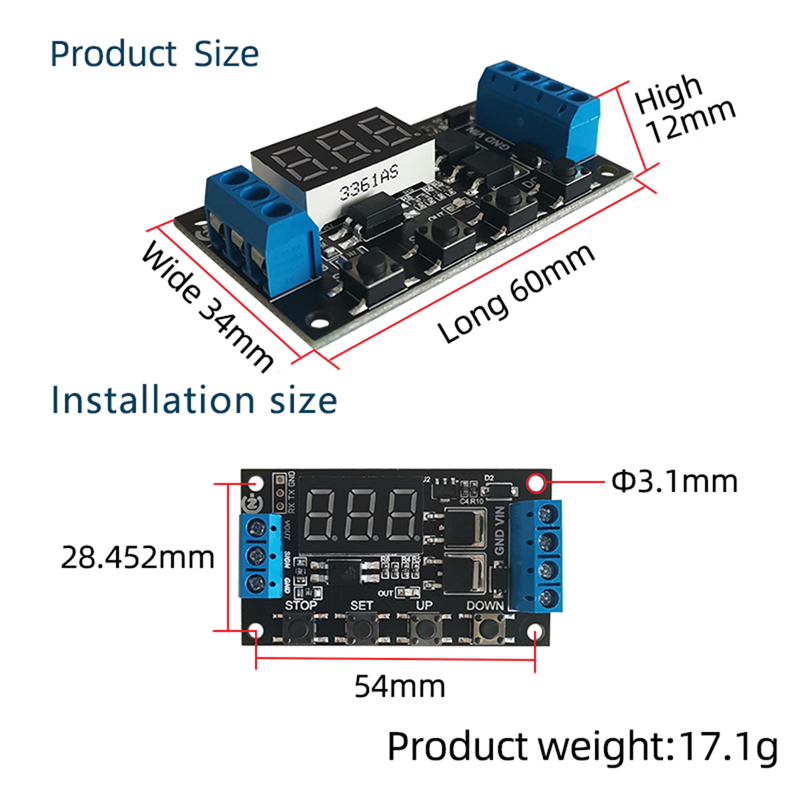
5: Service life: unlimited switching; working temperature: -40 to 85°C; size: 60*34*12mm
6: With optocoupler isolation, enhanced anti-interference ability, industrial-grade circuit board, set parameters are always remembered after power failure.
Attention:
1. The module is an active live output, and the voltage at the output end (load end) is equal to the input end voltage (DC5V-30V).
2. The poles of 'DC+' and 'load+' are internally short-circuited, but the poles of 'DC-' and 'load-' cannot be short-circuited during use, otherwise the load will not be controlled to turn on and off, which is equivalent the load is always energized.
Timing range: 0.1 second (minimum) ~ 999 minutes (maximum) continuously adjustable
How to Choose Timing Range:
After setting the parameter value in the mode selection interface, short press STOP button to select the timing range;
XXX. The decimal point is in the ones place, timing range: 1 second to 999 seconds
The decimal point of XX.X is in ten's place, timing range: 0.1 second to 99.9 second
X.X.X. decimal points are all lit, timing range: 1 minute to 999 minutes
For example, if you want to set the OP to 3.2 seconds, then move the decimal point to the tens place, and the digital tube will display 03.2
Parameter description: OP is the on-time, CL is the off time, LOP is the number of cycles (1 to 999 times, "---" represents infinite cycles)
These parameters are independent of each other, but each mode shares these parameters. For example, the on-time OP is set to 5 seconds in P1. The user wants to switch to P2 mode, then when entering P2 to set the corresponding parameters, OP will also be 5
second;
In the main interface (display 000), short press the SET button, OP (CL, LOP) and the corresponding time XXX will be displayed;
If there is only OP (for example, mode P1) time in the mode, then short press the SET key will only display OP and the corresponding time;
If there are OP, CL, LOP in the mode (such as mode P2, P3), short press the SET key will display OP and corresponding time, CL and corresponding time, LOP and corresponding times;
After setting the mode, you can easily view the parameters set in the current mode by short pressing the SET button on the main interface, which is very convenient!
How to Set Parameters:
1. First determine the working mode of the module;
2. According to the working mode of the module, in the main interface (when the module is powered on, it will flash the current working mode (default P 1 mode), and then enter the main interface,) "Long press the SET button for 2 seconds and then release" Enter the mode selection interface, select the mode to be set (P0~P-15) by short pressing the UP and DOWN buttons;
3. After selecting the mode to be set (for example, P3), short press the SET button to set the corresponding parameters, then the parameters to be set will flash (OP on time, CL off time, LOP cycle times (“--- ”Represents an infinite cycle) ), adjust the parameter value through UP and DOWN, support long press (rapid increase or decrease) and short press (increase or decrease by 1 unit); after setting the parameter value, short press the STOP button. Select the decimal point position, select the timing range (corresponding time 0.1 second ~ 999 minutes); Short press the SET button to set the next parameter of the current mode, the process is the same as above;
4. Swipe screen mode, after selecting the mode to be set (for example, P 15), short press the SET key to set the corresponding parameters, then the parameters to be set will flash (lower limit of CLL disconnection time, upper limit of CLH disconnection time, SP output Speed (20-100%), adjust parameter values through UP and DOWN, support long press (rapid increase or decrease) and short press (increase or decrease by 1 unit), timing range (corresponding time 0.1 second to 99.9 second) ; Short press the SET key to set the next parameter of the current mode, the process is the same as above;
5. After setting the parameters of the selected mode, press and hold the SET button for 2 seconds and then release, the currently set mode will flash, and then return to the main interface. The parameter setting is successful, very simple!
Main Interface: "000" is displayed when the module is not working, (no decimal point), and the module is working with a decimal point, which is very clear!
Mode Selection Interface: Long press the SET button to enter, after the setting is completed, long press the SET button to exit and return to the main interface. Very simple!
STOP Button Function Expansion:
Module Enable Mode:
1. ON: The module is allowed to be turned on during the OP conduction time;
2.OFF: The module is forbidden to be turned on, and is always off;
Short press the STOP button on the main interface to switch between ON and OFF, the current state will flash, and then return to the main interface. (This function is an emergency stop function, one key to open and close the module)
Sleep Mode:
1. C-L sleep mode: within three minutes, without any operation, the digital tube automatically turns off the display, and the program runs normally;
2.0-d normal mode: the digital tube is always on for display;
Long press the STOP button for 2 seconds and then release it to realize the switch between C-L and 0-d state, the current state will flash, and then return to the main interface.